Static S3 Website with CICD - Walkthrough
We have developed a Terraform module for AWS which provisions a static website that: is serverless, enforces SSL, encrypts data at rest and in transit, is globally distributed, supports restricting access to website by IP, sets up nice DNS entries, deploys new changes when commits are pushed to a CodeCommit branch, clears the CloudFront cache after deployments, sends notifications on successful and failed deploys, supports site generation frameworks like Hugo or Jekyll, supports URLs of subdirectories that do not have index.html specified, supports custom error pages, and supports debug mode. Check it out!
A Super-Charged Static Website Setup
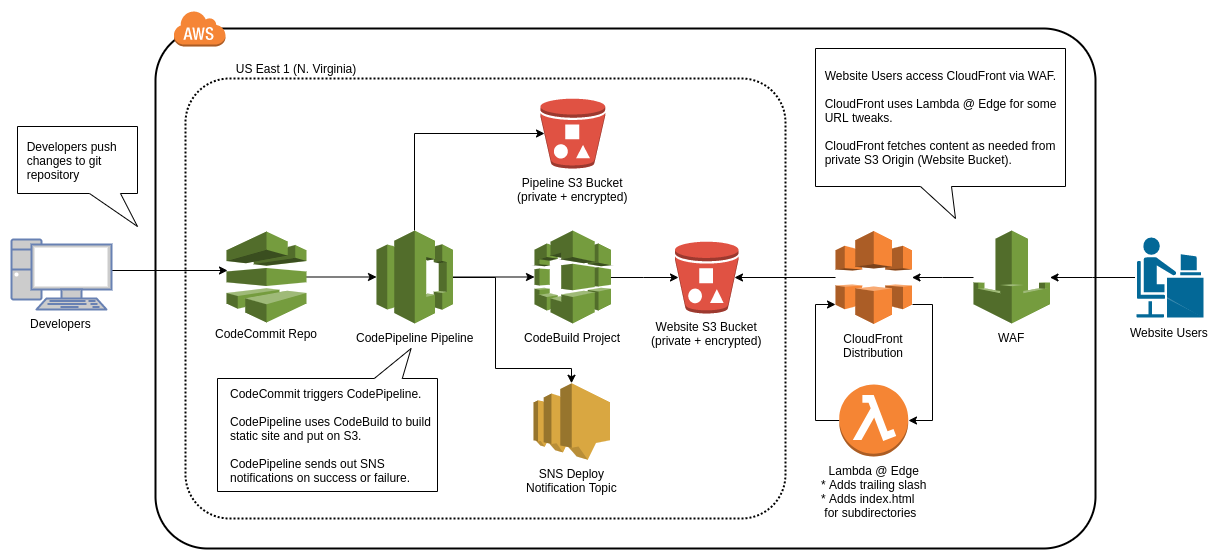
For static websites, like this one, an AWS best practice is to host the static content in an S3 bucket and serve it to your users via the AWS CDN, CloudFront.
There are lots of examples of how to set this up. There are also lots of Terraform modules that solve this problem. In this post I will outline our Terraform module solution to get a secure static website backed by S3 / CloudFront set up easily:
The Ordinary Experts terraform-aws-static-website-with-cicd module, available on GitHub and the Terraform Registry.
So what does it do? Lots!
Features
Serverless
This one is kind-of a given, since one of the main reasons people choose S3 / CloudFront to deliver content is that they don’t have to manage any instances.
Enforces SSL
CloudFront has a feature which can redirect users who access your site via http to the https equivalent - we set that option on the CloudFront distribution. This module doesn’t provision an ACM certificate for you - you have to provide a certificate ARN and it will attach it to the CloudFront distribution.
Encrypts data at rest and in transit
We set bucket policies on the website bucket and the pipeline artifact bucket to encrypt objects by default. CloudFront uses the S3 REST API endpoint for the website bucket, which is over HTTPS.
Globally distributed
Since we are using CloudFront, our content is cached at edge locations all over the world. One option to note is the PriceClass option, which we have set to PriceClass_All (the default), meaning that objects are served from the edge location for which latency is lowest for that viewer. Future versions may allow the customization of this parameter to for cost reduction purposes.
Supports restricting access to website by IP
The module supports specifying one or more IP ranges. If you do, then it will provision a WAF which will filter traffic to allow only those IP ranges. We use this feature for our dev sites to limit access to only Ordinary Experts staff.
Sets up nice DNS entries
This module sets up two Route 53 records, one for the provided domain and one for the domain prefixed with www.. As part of the set up for this module, you need to create a hosted zone that matches the domain that you would like the website to use. The module creates these records under that hosted zone.
Deploys new changes when commits are pushed to a CodeCommit branch
This module pulls changes from a CodeCommit git repository via a CodePipeline pipeline. You specify a git branch (default master) that the pipeline will poll for changes. Since we use git-flow, we use this feature to automatically deploy changes to our dev site when we push to our develop branch and to production when we push to our master branch.
Clears the CloudFront cache after deployments
Since CloudFront’s whole goal is to cache content close to the viewer, when new changes are pushed to your origin bucket, some viewers may not see those changes until the CloudFront cache of that object expires for that location. To address this, CloudFront has a method of invalidating files, which will cause them to be re-fetched from the origin. We trigger an invalidation of all the CloudFront files after each deployment.
Sends notifications on successful and failed deploys
After pushing a commit, it takes a few minutes for the change to flow through the pipeline. Once it is done, the email specified in the parameters will get a somewhat generic notification saying that the deployment succeeded or failed.
Supports site generation frameworks like Hugo or Jekyll
For a static site of any size, it is nice to use a site generator to help with the common elements, i.e. header / footers, etc. This module supports a build step where the site can be generated from its source. By default, the build is done by running a script called build in the top-level of the repo. For example, this website uses Hugo as its generator - our build file looks like:
#!/usr/bin/env bash

wget -O /tmp/hugo.deb https://github.com/gohugoio/hugo/releases/download/v0.31.1/hugo_0.31.1_Linux-64bit.deb
dpkg -i /tmp/hugo.deb
hugo
This installs Hugo on the CodeBuild instance and runs hugo to generate the site into the public folder before it is uploaded to S3.
Supports URLs of subdirectories that do not have trailing slashes or index.html specified
When using CloudFront to serve websites from a private S3 bucket, then CloudFront won’t automatically serve the index.html files from subdirectories of your website. This module uses a Lambda@Edge function that inspects incoming requests and, if they don’t have an extension, adds a trailing slash and index.html.
Supports custom error pages
CloudFront allows the specification of custom error page paths for different error codes. Currently this module allows you to specify a custom error page path for 403 and 404 errors, so the custom page will be seen for unknown pages as well as when unauthorized users try to access a site with whitelisting turned on. Here is an example of a custom error page from our IP whitelisted dev site dev.ordinaryexperts.com.
Supports debug mode which turns off CloudFront caching
Finally, when working on this module there were times when it was nice to always have CloudFront fetch content from the origin. This can be done by setting the debug variable to true, which causes the DefaultTTL, MaxTTL, and MinTTL CloudFront values to all be set to 0.
Getting Started
We have an example Terraform configuration on the GitHub README, however there is some pre-work that needs to be done before you can do terraform apply.
One thing before you start - currently this module can only be deployed into the us-east-1 (N. Virginia) region - so make sure you select that region when creating region-specific resources.
First, you need to set up a Route 53 Hosted Zone for the domain of the website you want to host (not including the www). Once that Hosted Zone has been created and delegated, you are ready to create the SSL certificate.
When creating the SSL in ACM, be sure to specify the domain of the website you are hosting (again without the www) as well as the domain prefixed with *., i.e. if marketing.yourdomain.com was the domain, then also add *.marketing.yourdomain.com to the SSL certificate request. Since we have the Hosted Zone already setup in Route 53, if you chose the DNS validation option then the console will give you the option to automatically create the needed DNS records right from the SSL certificate wizard - easy!
After you have the Hosted Zone and the ARN for the SSL certificate you just created, you are almost ready! The last step is to create a CodeCommit repo that will host your website content. After you create the repo you can start by creating a sample index.html file in the public directory of the repository. FYI check out our post on authenticating to CodeCommit with AWS Vault.
Now you have all the values needed - from this point check out the README.md on GitHub for deployment examples.
Good luck & happy coding!
Dylan